消息通知基本是现在app的标配功能,提高信息获取的有效性,推送一些重要的、有价值的信息
Notification消息通知写法修改
之前的写法
// 发送简单的通知消息(包括消息标题和消息内容)
    private void sendSimpleNotify(String title, String message) {
        // 发送消息之前要先创建通知渠道,创建代码见MainApplication.java
        // 创建一个跳转到活动页面的意图
        Intent clickIntent = new Intent(this, MainActivity.class);
        // 创建一个用于页面跳转的延迟意图
        PendingIntent contentIntent = PendingIntent.getActivity(this,
                R.string.app_name, clickIntent, PendingIntent.FLAG_UPDATE_CURRENT);
        // 创建一个通知消息的建造器
        Notification.Builder builder = new Notification.Builder(this);
        if (Build.VERSION.SDK_INT >= Build.VERSION_CODES.O) {
            // Android 8.0开始必须给每个通知分配对应的渠道
            builder = new Notification.Builder(this, getString(R.string.app_name));
        }
        builder.setContentIntent(contentIntent) // 设置内容的点击意图
                .setAutoCancel(true) // 点击通知栏后是否自动清除该通知
                .setSmallIcon(R.mipmap.ic_launcher) // 设置应用名称左边的小图标
                .setSubText("这里是副本") // 设置通知栏里面的附加说明文本
                // 设置通知栏右边的大图标
                .setLargeIcon(BitmapFactory.decodeResource(getResources(), R.drawable.ic_app))
                .setContentTitle(title) // 设置通知栏里面的标题文本
                .setContentText(message); // 设置通知栏里面的内容文本
        Notification notify = builder.build(); // 根据通知建造器构建一个通知对象
        // 从系统服务中获取通知管理器
        NotificationManager notifyMgr = (NotificationManager)
                getSystemService(Context.NOTIFICATION_SERVICE);
        // 使用通知管理器推送通知,然后在手机的通知栏就会看到该消息
        notifyMgr.notify(R.string.app_name, notify);
    }
修改后的写法 // 发送简单的通知消息(包括消息标题和消息内容) private void sendSimpleNotify(String title, String message) { // 发送消息之前要先创建通知渠道,创建代码见MainApplication.java // 创建一个跳转到活动页面的意图 Intent clickIntent = new Intent(this, MainActivity.class); // 创建一个用于页面跳转的延迟意图 // PendingIntent contentIntent = PendingIntent.getActivity(this, // R.string.app_name, clickIntent, PendingIntent.FLAG_UPDATE_CURRENT); PendingIntent contentIntent = PendingIntent.getActivity(this, R.string.app_name, clickIntent, PendingIntent.FLAG_UPDATE_CURRENT | PendingIntent.FLAG_IMMUTABLE); // PendingIntent contentIntent; // //安卓12开始就需要添加对应的标志为 // if (android.os.Build.VERSION.SDK_INT >= android.os.Build.VERSION_CODES.S) { // contentIntent = PendingIntent.getBroadcast(this, R.string.app_name, clickIntent, PendingIntent.FLAG_UPDATE_CURRENT | PendingIntent.FLAG_IMMUTABLE); // } else { // contentIntent = PendingIntent.getBroadcast(this, R.string.app_name, clickIntent, PendingIntent.FLAG_ONE_SHOT); // } // 创建一个通知消息的建造器 Notification.Builder builder = new Notification.Builder(this); if (Build.VERSION.SDK_INT >= Build.VERSION_CODES.O) { // Android 8.0开始必须给每个通知分配对应的渠道 builder = new Notification.Builder(this, getString(R.string.app_name)); } builder.setContentIntent(contentIntent) // 设置内容的点击意图 .setAutoCancel(true) // 点击通知栏后是否自动清除该通知 .setSmallIcon(R.mipmap.ic_launcher) // 设置应用名称左边的小图标 .setSubText("这里是副本") // 设置通知栏里面的附加说明文本 // 设置通知栏右边的大图标 .setLargeIcon(BitmapFactory.decodeResource(getResources(), R.drawable.ic_launcher_foreground)) .setContentTitle(title) // 设置通知栏里面的标题文本 .setContentText(message); // 设置通知栏里面的内容文本 Notification notify = builder.build(); // 根据通知建造器构建一个通知对象 // 从系统服务中获取通知管理器 NotificationManager notifyMgr = (NotificationManager) getSystemService(Context.NOTIFICATION_SERVICE); //安卓10以上需要自己实现对应的消息推送通道 if (android.os.Build.VERSION.SDK_INT >= android.os.Build.VERSION_CODES.O) { NotificationChannel mChannel = new NotificationChannel(getString(R.string.app_name), getString(R.string.app_name), NotificationManager.IMPORTANCE_LOW); mChannel.setDescription("notication channel"); mChannel.setShowBadge(false); notifyMgr.createNotificationChannel(mChannel); } // 使用通知管理器推送通知,然后在手机的通知栏就会看到该消息 notifyMgr.notify(R.string.app_name, notify); }解析(修改说明)
一个就是PendingIntent的使用,在安卓12开始,无论是创建或使用的时候flags参数要求必须添加 FLAG_IMMUTABLE或者FLAG_MUTABLE的两个之中其中一个,而且官方还强烈推荐使用FLAG_IMMUTABLE(代码不同,依情况而定官方的推荐)
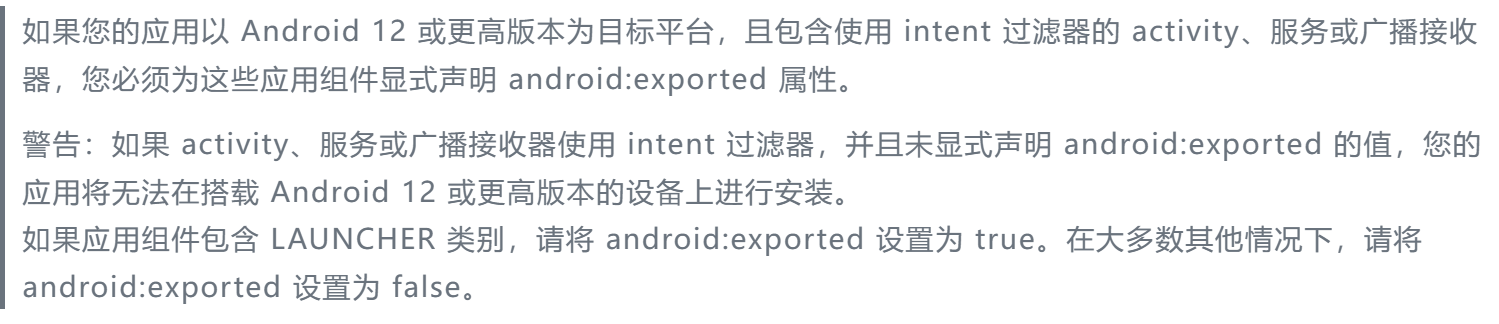
安卓8开始,需要给每个消息通知分配不同的渠道,在安卓12开始,还需要实现对应的渠道
关于打包之后,报错软件解析失败
之前的写法
<application
    android:allowBackup="true"
    android:icon="@mipmap/ic_launcher"
    android:label="@string/android_study"
    android:roundIcon="@mipmap/ic_launcher_round"
    android:supportsRtl="true"
    android:theme="@style/AppTheme">
    <activity android:name=".MainActivity">
        <intent-filter>
            <action android:name="android.intent.action.MAIN" />

            <category android:name="android.intent.category.LAUNCHER" />
        </intent-filter>
    </activity>
</application>
修改后的写法
<application
    android:allowBackup="true"
    android:icon="@mipmap/ic_launcher"
    android:label="@string/android_study"
    android:roundIcon="@mipmap/ic_launcher_round"
    android:supportsRtl="true"
    android:theme="@style/AppTheme">
    <activity android:name=".MainActivity" android:exported="true">  //区别在这里
        <intent-filter>
            <action android:name="android.intent.action.MAIN" />

            <category android:name="android.intent.category.LAUNCHER" />
        </intent-filter>
    </activity>
</application>
解析(修改说明)
总结
需要不停的学习,不然会落后的
#好好学习!